No edit summary Tag: 2017 source edit |
No edit summary |
||
| (4 intermediate revisions by the same user not shown) | |||
| Line 1: | Line 1: | ||
{{DISPLAYTITLE:Personal navigation}} | {{DISPLAYTITLE:Personal navigation}} | ||
==Accessing the personal navigation== | ==Accessing the personal navigation== | ||
| Line 20: | Line 18: | ||
'''To customize the content of | '''To customize the content of the user menu:''' | ||
# '''Click''' on your user profile image | # '''Click''' on your user profile image. | ||
# '''Click''' Edit user menu | # '''Click''' ''Edit user menu.'' | ||
===Menu editor=== | ===Menu editor=== | ||
{{#dpl: title=Manual:Extension/BlueSpiceDiscovery/Main_navigation|include=# | {{#dpl: title=Manual:Extension/BlueSpiceDiscovery/Main_navigation|include=#Menu editor}} | ||
===Source edit mode=== | ===Source edit mode=== | ||
{{#dpl: title=Manual:Extension/BlueSpiceDiscovery/Main_navigation|include=# | {{#dpl: title=Manual:Extension/BlueSpiceDiscovery/Main_navigation|include=#Source edit mode}} | ||
{{Translation}} | {{Translation}} | ||
[[Category:Personalization]] | [[Category:Personalization]] | ||
Latest revision as of 13:59, 7 March 2023
Every logged-in user has their own user menu. Changes to this menu are only visible to the individual user.
The menu is separated in two sections (see screenshot):
- Customizable links
- Personal tools (these links cannot be edited)
Customizing the sidebar
Initially, the customizable links show the following widgets:
- Pages visited (widget PAGESVISITED)
- My edits (widget YOUREDITS)
These widgets can be removed individually.
To customize the content of the user menu:
- Click on your user profile image.
- Click Edit user menu.
Menu editor
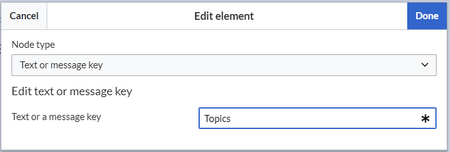
To add a new menu header using the menu editor:
- Click Add new element to create a new menu header.
- Enter the text for your menu header. In a multilingual wiki, you can also enter a message key.
- Click Done.
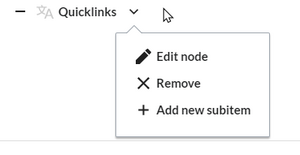
To add links:
- Select Add new subitem from the dropdown menu of the menu header.
- Enter the page name as the link target and the label that you want to show:
- Click Done.
- Repeat steps 1-3.
- Click Save changes.
Source edit mode
To add new links:
- Change to source editing mode.
- Create one or more navigation links (with or without section heading). The following example shows a link to the page "Company" with the label "Our company" and an external link to the BlueSpice website with the label "Website". The links are grouped together under the section heading "Quicklinks":
*Quicklinks
**Company|Our company
**https//www.bluespice.com/de|Website
- Save the page. The links are now shown in the main navigation.
Link labels may collide with system messages. If this is the case, simply append the HTML-code for an empty space to the description:
**Portal|Portal 


